Send data over RF to Excel
One of the perks of telemetry systems is the ability to gather essential performance data remotely, no wires attached.

Figure 1. ESOC serves as the Operations Control Centre for ESA missions, and hosts the Main Control Room (shown here), combined Dedicated Control Rooms for specific missions and the ESTRACK Control Centre [ESA].
As I stated in previous posts, we will start by just estimating altitude with a barometric pressure sensor. Then we will be adding up more sensors, like accelerometers and gyros and end up with something like the Rocketduino. But first things first.
We will send raw or processed data over RF to a laptop. To make things easy, Excel will take care of grabbing all the values and process them. For that, some fundamental VBA knowledge is required, but fortunately, there are lots of guides and example code available on-line.
The first step is to connect Excel to the RF receiver, and luckily, I found a quite handy Serial Port Communication tutorial. Just copy the code shown in a new Module inside Excel’s Visual Basic Editor. Now you can communicate via serial port. The snippet below shows how to start a simple communication.
Dim sample As Boolean

Private Sub CommandButton1_Click() 	' Send data

    Dim intPortID As Integer 		' Ex. 1, 2, 3, 4 for COM1 - COM4

    Dim lngStatus As Long

    Dim strData   As String

    Dim buff_ent  As String

    Dim dataRange As Range

    Dim i, n, m, length As Long

    Static rep As Integer
    Set dataRange = Range("B4")
    i = 0

    If CommandButton1.Caption = "START" Then

        CommandButton1.Caption = "STOP"
        strData = "I"

        intPortID = Range("B2").Value
        lngStatus = CommOpen(intPortID, "COM" & CStr(intPortID), _

	                                "baud=9600 parity=N data=8 stop=1")

        lngStatus = CommWrite(intPortID, strData)
        sample = True

        While sample = True

            i = i + 1

            dataRange.Value = i     ' number of samples gathered so far

            length = 0

            While length < 2

                lngStatus = CommRead(intPortID, strData, 1)

                length = length + lngStatus

                buff_ent = buff_ent & strData

            Wend

            dataRange.Offset(i , 0).Value = Val(buff_ent) / 10

            buff_ent = ""

            DoEvents

        Wend

        strData = "F"

        lngStatus = CommWrite(intPortID, strData)

        Call CommClose(intPortID)

    Else

        CommandButton1.Caption = "START"

        sample = False

    End If
End Sub
The µC will send data over an RF module as soon as it gets called by Excel (USART Receive Interrupt).
#include <p18LF14K50.h>

#include <usart.h>
[...]
void High_Int_Handler (void) {

    if (INTCONbits.TMR0IF==1) {     // TMR0 Overflow Interrupt Flag

        INTCONbits.TMR0IF=0;	    // Clear Flag

        TMR0H=15536/256;

        TMR0L=15536%256;

        PORTDbits.RD0=!(PORTDbits.RD0);
        /* Get sensor values */
        while (BusyUSART());

        WriteUSART(tmp[0]);

        while (BusyUSART());

        WriteUSART(tmp[0]);

    }

    else if (PIR1bits.RCIF) {       // USART Receive Interrupt Flag

        tmp[0] = ReadUSART();

        if (tmp[0] == 'I') {

            T0CONbits.TMR0ON=1;     // TMR0 On Control bit

            TMR0H=15536/256;

            TMR0L=15536%256;

        }

        if (tmp[0] == 'F') {

            T0CONbits.TMR0ON=0;     // TMR0 Off Control bit

        }

    }

}
void main(void) {

    TRISCbits.RC6 = 0;      // RC6/TX as output

    TRISCbits.RC7 = 1;      // RC7/RX as input
    OpenUSART (USART_TX_INT_OFF & USART_RX_INT_ON & USART_ASYNCH_MODE

               & USART_EIGHT_BIT & USART_CONT_RX & USART_BRGH_HIGH, 25);
    T0CON = 0x01;

    INTCONbits.GIE = 1;     // Gobal Interrupt Enable

    INTCONbits.PEIE = 1;    // Peripheral Interrupts Enable

    INTCONbits.TMR0IE = 1;  // TMR0 Overflow Interrupt Enable

    PIE1bits.RCIE = 1;      // USART Receive Interrupt Enable
    while(1);               // Main loop

}
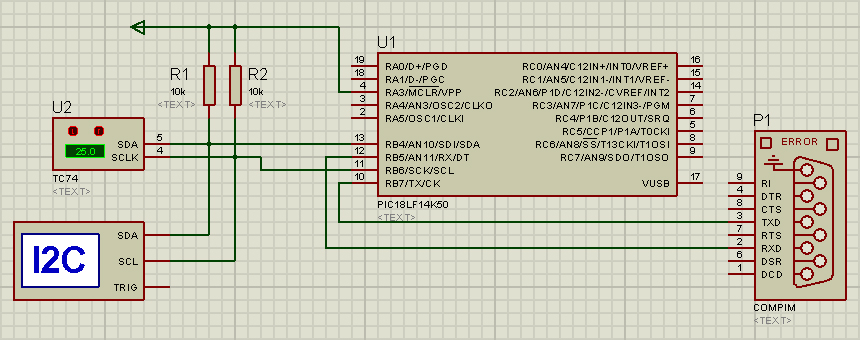
ISIS Proteus does not have an RF module, so we can use the COM Port model shown in Figure 2 to check our design. But when running Proteus and Excel within the same computer, a virtual Serial Port driver is needed as to pair two ports via a virtual null modem cable. For this, one can use Eltima virtual Serial port software or any other commercial or open source solution.
By thoroughly testing our code and design we can save both time and money when time comes to assemble the final design.

